
JavaScript: controlling web page with gestures
Our experience in implementing remote control and experimenting with different approaches, including Computer Vision technology. In this article, we'll share the results of our experiments using Google's MEDIAPIPE library for Computer Vision.
Full-Stack Developer

On this page(10)
During our work on Stardio, we were assigned the task of implementing remote control of the application. We explored different options for implementation, and one of the approaches we experimented with was Computer Vision technology. In this article, I will be sharing the results of our experiments with one of the well-known libraries for ComputerVision - MEDIAPIPE, which is developed by Google.
In the past, controlling the content of a web page using gestures was only seen in science fiction movies. But nowadays, all you need to make it a reality is a video camera, a browser, and a library from Google. In this tutorial, we will be demonstrating how to implement gesture control using pure JavaScript. To detect and track hand gestures, we will be using MediaPipe, and to manage dependencies, we will be using npm.
The sample code can be found in this repository.
Project preparation and setup
Step 1
Create a pure JS project with Vite by vanilla template:
motion-controls - name of project
vanilla - name of template
yarn create vite motion-controls --template vanilla
Step 2
Go to the created directory, install the dependencies and start development server:
cd motion-controlsnpm inpm run dev
Step 3
Edit content of body in index.html:
<video></video><canvas></canvas><script type="module" src="/js/get-video-data.js"></script>
Getting video data and rendering it on the canvas
Create a js directory at the root of the project and a get-video-data.js file in it.
Get references to the video and canvas elements, as well to the 2D graphics drawing context:
const video$ = document.querySelector("video");const canvas$ = document.querySelector("canvas");const ctx = canvas$.getContext("2d");
Define the width and height of the canvas, as well as the requirements (constraints) for the video data stream:
const width = 640;const height = 480;canvas$.width = width;canvas$.height = height;const constraints = { audio: false, video: { width, height },};
Get access to the user's video input device using the getUserMedia method; pass the stream to the video element using the srcObject attribute; after loading the metadata, we start playing the video and call the requestAnimationFrame method, passing it the drawVideoFrame function as an argument:
navigator.mediaDevices .getUserMedia(constraints) .then((stream) => { video$.srcObject = stream; video$.onloadedmetadata = () => { video$.play(); requestAnimationFrame(drawVideoFrame); }; }) .catch(console.error);
Finally, we define the function to draw the video frame on the canvas using the drawImage method:
function drawVideoFrame() { ctx.drawImage(video$, 0, 0, width, height); requestAnimationFrame(drawVideoFrame);}
Note
That's calling requestAnimationFrame twice runs an infinite loop of animation at a device-specific frame rate, but typically 60 frames per second (FPS). The frame rate can be adjusted using the timestamp argument passed to the requestAnimationFrame callback (example):
function drawVideoFrame(timestamp) { // ...}
Result
Hand detection and tracking
To detect and track the hand, we need a few additional dependencies:
yarn add @mediapipe/camera_utils @mediapipe/drawing_utils @mediapipe/hands
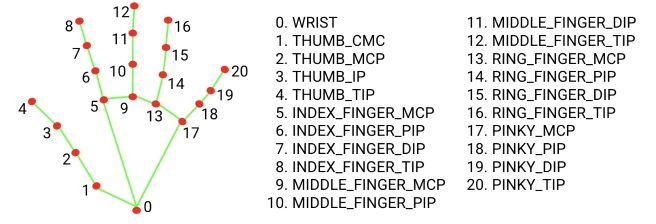
MediaPipe Hands first detects the hands, then determines 21 key points (3D landmarks), which are joints, for each hand. Here's what it looks like:
Create a track-hand-motions.js file in the js directory.
Importing dependencies:
import { Camera } from "@mediapipe/camera_utils";import { drawConnectors, drawLandmarks } from "@mediapipe/drawing_utils";import { Hands, HAND_CONNECTIONS } from "@mediapipe/hands";
The Camera constructor allows you to create instances to control a video camera and has the following signature:
export declare class Camera implements CameraInterface { constructor(video: HTMLVideoElement, options: CameraOptions); start(): Promise<void>; // We will not use this method stop(): Promise<void>;}
The constructor takes a video element and the following settings:
export declare interface CameraOptions { // Callback for frame caption onFrame: () => Promise<void>| null; // camera facingMode?: 'user'|'environment'; // width of frame width?: number; // height of frame height?: number;}
The start method starts the frame capture process.
The Hands constructor allows you to create instances for detecting hands and has the following signature:
export declare class Hands implements HandsInterface { constructor(config?: HandsConfig); onResults(listener: ResultsListener): void; send(inputs: InputMap): Promise<void>; setOptions(options: Options): void; // more method what we did not use}
Constructor have this config:
export interface HandsConfig { locateFile?: (path: string, prefix?: string) => string;}
This callback loads additional files needed to create an instance:
hand_landmark_lite.tflitehands_solution_packed_assets_loader.jshands_solution_simd_wasm_bin.jshands.binarypbhands_solution_packed_assets.datahands_solution_simd_wasm_bin.wasm
The setOptions method allows you to set the following discovery options:
export interface Options { selfieMode?: boolean; maxNumHands?: number; modelComplexity?: 0|1; minDetectionConfidence?: number; minTrackingConfidence?: number;}
You can read about these settings here. We will set maxNumHands: 1 to detect only one hand and modelComplexity : 0 to improve performance at the expense of detection accuracy.
The send method is used to process a single frame of data. It is called in the **onFrame **method of the Camera instance.
The onResults method accepts a callback to handle the hand detection results.
The drawLandmarks method allows you to draw hand keypoints and has the following signature:
export declare function drawLandmarks( ctx: CanvasRenderingContext2D, landmarks?: NormalizedLandmarkList, style?: DrawingOptions): void;
It accepts a drawing context, keypoints, and the following styles:
export declare interface DrawingOptions { color?: string|CanvasGradient|CanvasPattern| Fn<Data, string|CanvasGradient|CanvasPattern>; fillColor?: string|CanvasGradient|CanvasPattern| Fn<Data, string|CanvasGradient|CanvasPattern>; lineWidth?: number|Fn<Data, number>; radius?: number|Fn<Data, number>; visibilityMin?: number;}
The drawConnectors method allows you to draw connection lines between keypoints and has the following signature:
export declare function drawConnectors( ctx: CanvasRenderingContext2D, landmarks?: NormalizedLandmarkList, connections?: LandmarkConnectionArray, style?: DrawingOptions): void;
It takes care of defining keypoints start and end keypoints index pairs (HAND_CONNECTIONS), and styles.
Back to editing track-hand-motions.js:
const video$ = document.querySelector("video");const canvas$ = document.querySelector("canvas");const ctx = canvas$.getContext("2d");const width = 640;const height = 480;canvas$.width = width;canvas$.height = height;
We define the function for processing the results of hand detection:
function onResults(results) { // of the entire result object, we are only interested in the `multiHandLandmarks` property, // which contains arrays of control points of detected hands if (!results.multiHandLandmarks.length) return; // when 2 hand are found, for example `multiHandLandmarks` will contain 2 arrays of control points console.log("@landmarks", results.multiHandLandmarks[0]); // draw a video frame ctx.save(); ctx.clearRect(0, 0, width, height); ctx.drawImage(results.image, 0, 0, width, height); // iterate over arrays of breakpoints // we could do without iteration since we only have one array, // but this solution is more flexible for (const landmarks of results.multiHandLandmarks) { // draw keypoints drawLandmarks(ctx, landmarks, { color: "#FF0000", lineWidth: 2 }); // draw lines drawConnectors(ctx, landmarks, HAND_CONNECTIONS, { color: "#00FF00", lineWidth: 4, }); } ctx.restore();}
Create an instance to detect the hand, set the settings, and register the result handler:
const hands = new Hands({ locateFile: (file) => `../node_modules/@mediapipe/hands/${file}`,});hands.setOptions({ maxNumHands: 1, modelComplexity: 0,});hands.onResults(onResults);
Finally, we create an instance to control the video camera, register the handler, set the settings and start the frame capture process:
const camera = new Camera(video$, { onFrame: async () => { await hands.send({ image: video$ }); }, facingMode: undefined, width, height,});camera.start();
Please note: by default, the facingMode setting is set to user - the source of video data is the front (front) laptop camera. Since in my case this source is a USB camera, the value of this setting should be undefined.
The array of control points of the detected brush looks like this:
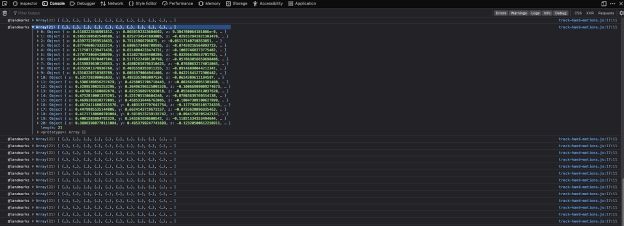
The indexes correspond to the joints of the hand, as shown in the image above. For example, the index of the first index finger joint from the top is 7. Each control point has x, y, and z coordinates ranging from 0 to 1.
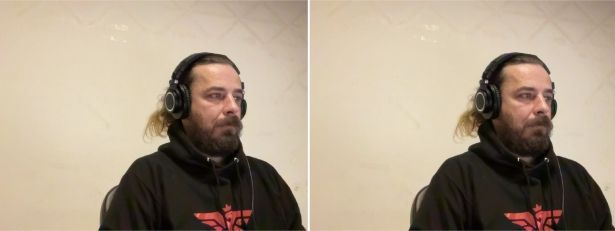
The result of executing the example code:
Pinching Gesture Definition:
A pinch as a gesture is the bringing together of the tips of the index and thumb to a fairly close distance.
You ask, 'What exactly is considered close enough distance?'"
We have decided to define this distance as 0.8 for both the x and y coordinates, and 0.11 for the z coordinate. Personally, I concur with these calculations. Here's a visual representation:
const distance = { x: Math.abs(fingerTip.x - thumbTip.x), y: Math.abs(fingerTip.y - thumbTip.y), z: Math.abs(fingerTip.z - thumbTip.z), };const areFingersCloseEnough = distance.x < 0.08 && distance.y < 0.08 && distance.z < 0.11;
Few more important things:
we want to register and handle the start, continuation, and end of a pinch (pinch_start, pinch_move, and pinch_stop, respectively);
to determine the transition of a pinch from one state to another (beginning -> end, or vice versa), it is required to save the previous state;
the transition detection must be performed with some delay, for example 250 ms.
Create a detect-pinch-gesture.js file in the js directory.
The beginning of the code is identical to the code of the previous example:
import { Camera } from "@mediapipe/camera_utils";import { Hands } from "@mediapipe/hands";const video$ = document.querySelector("video");const width = window.innerWidth;const height = window.innerHeight;const handParts = { wrist: 0, thumb: { base: 1, middle: 2, topKnuckle: 3, tip: 4 }, indexFinger: { base: 5, middle: 6, topKnuckle: 7, tip: 8 }, middleFinger: { base: 9, middle: 10, topKnuckle: 11, tip: 12 }, ringFinger: { base: 13, middle: 14, topKnuckle: 15, tip: 16 }, pinky: { base: 17, middle: 18, topKnuckle: 19, tip: 20 },};const hands = new Hands({ locateFile: (file) => `../node_modules/@mediapipe/hands/${file}`,});hands.setOptions({ maxNumHands: 1, modelComplexity: 0,});hands.onResults(onResults);const camera = new Camera(video$, { onFrame: async () => { await hands.send({ image: video$ }); }, facingMode: undefined, width, height,});camera.start();const getFingerCoords = (landmarks) => landmarks[handParts.indexFinger.topKnuckle];function onResults(handData) { if (!handData.multiHandLandmarks.length) return; updatePinchState(handData.multiHandLandmarks[0]);}
Define event types, delay and pinch state:
const PINCH_EVENTS = { START: "pinch_start", MOVE: "pinch_move", STOP: "pinch_stop",};const OPTIONS = { PINCH_DELAY_MS: 250,};const state = { isPinched: false, pinchChangeTimeout: null,};
Declare a pinch detection function:
function isPinched(landmarks) { const fingerTip = landmarks[handParts.indexFinger.tip]; const thumbTip = landmarks[handParts.thumb.tip]; if (!fingerTip || !thumbTip) return; const distance = { x: Math.abs(fingerTip.x - thumbTip.x), y: Math.abs(fingerTip.y - thumbTip.y), z: Math.abs(fingerTip.z - thumbTip.z), }; const areFingersCloseEnough = distance.x < 0.08 && distance.y < 0.08 && distance.z < 0.11; return areFingersCloseEnough;}
Define a function that creates a custom event using the CustomEvent constructor and calls it using the dispatchEvent method:
// the function takes the name of the event and the data - the coordinates of the fingerfunction triggerEvent({ eventName, eventData }) { const event = new CustomEvent(eventName, { detail: eventData }); document.dispatchEvent(event);}
Define a pinch state update function:
function updatePinchState(landmarks) { // determine the previous state const wasPinchedBefore = state.isPinched; // determine the beginning or end of the pinch const isPinchedNow = isPinched(landmarks); // define a state transition const hasPassedPinchThreshold = isPinchedNow !== wasPinchedBefore; // determine the state update delay const hasWaitStarted = !!state.pinchChangeTimeout; // if there is a state transition and we are not in idle mode if (hasPassedPinchThreshold && !hasWaitStarted) { // call the corresponding event with a delay registerChangeAfterWait(landmarks, isPinchedNow); } // if the state remains the same if (!hasPassedPinchThreshold) { // cancel standby mode cancelWaitForChange(); // if the pinch continues if (isPinchedNow) { // trigger the corresponding event triggerEvent({ eventName: PINCH_EVENTS.MOVE, eventData: getFingerCoords(landmarks), }); } }}
We define the functions for updating the state and canceling the wait:
function registerChangeAfterWait(landmarks, isPinchedNow) { state.pinchChangeTimeout = setTimeout(() => { state.isPinched = isPinchedNow; triggerEvent({ eventName: isPinchedNow ? PINCH_EVENTS.START : PINCH_EVENTS.STOP, eventData: getFingerCoords(landmarks), }); }, OPTIONS.PINCH_DELAY_MS);}function cancelWaitForChange() { clearTimeout(state.pinchChangeTimeout); state.pinchChangeTimeout = null;}
We define the handlers for the beginning, continuation and end of the pinch (we simply print the coordinates of the upper joint of the index finger to the console):
function onPinchStart(eventInfo) { const fingerCoords = eventInfo.detail; console.log("Pinch started", fingerCoords);}function onPinchMove(eventInfo) { const fingerCoords = eventInfo.detail; console.log("Pinch moved", fingerCoords);}function onPinchStop(eventInfo) { const fingerCoords = eventInfo.detail; console.log("Pinch stopped", fingerCoords); // change background color on STOP document.body.style.backgroundColor = "#" + Math.floor(Math.random() * 16777215).toString(16);}
And register them:
document.addEventListener(PINCH_EVENTS.START, onPinchStart);document.addEventListener(PINCH_EVENTS.MOVE, onPinchMove);document.addEventListener(PINCH_EVENTS.STOP, onPinchStop);
Result on the video:
https://www.youtube.com/watch?v=KsLQRb6BhbI
Conclusion
Now that we have reached this point, we can interact with our web application however we desire. This includes changing the state and interacting with HTML elements, among other things.
As you can see, the potential applications for this technology are virtually limitless, so feel free to explore and experiment with it.
That concludes what I wanted to share with you in this tutorial. I hope you found it informative and engaging, and that it has enriched your knowledge in some way. Thank you for your attention, and happy coding!
Technologies
New Articles
New blog posts you may be interested in

Finance + Operations Alignment: What Actually Improved
When finance and operations run in separate realities, companies usually pay twice, first in time, then in errors. This case explains what improved after aligning dispatch, document flow, and invoicing readiness.
Read more
What Changed After Moving to Reservation Lifecycle Control
This case outlines practical change after moving from volume-push behavior to controlled reservation lifecycle management. The goal was not another dashboard. The goal was to change operational decision quality over time.
Read more
Compliance in Dispatch: Rules for Certification-Safe Assignment
Compliance in logistics is not only document control. It is daily assignment logic, whether specific equipment can carry specific material on a specific route. If this knowledge lives only in dispatcher memory, risk scales with volume.
Read moreRead also
Recommended reads for You
How companies lose control: too many tools, too many Excels, too many versions of the truth
Many companies don't screw up their digitalization by doing nothing. Quite the opposite. They gradually buy a series of tools, each of which solves a small part of their operation. But over time, they discover that instead of one functional system, they have fragmented processes, unreliable data, and people who keep their own Excel spreadsheets to themselves just to be safe.
Read more
Why Do Digital Transformation Projects Suffer such High Failure Rates?
Digital transformation is a priority for many companies, yet most initiatives still fail to deliver the expected results. Based on Moravio’s hands-on experience and insights shared by Dennis Fino, this perspective reflects what teams often overlook long before technology becomes the issue.
Read more
Build the Right Hotel Software and AI CRM System That Works for You
Helpful insights from our project manager Hsinyu Ko for hotels that want better software that truly fits how they work. Based on our experience from software projects.
Read more
Jakub Bílý
Head of Business Development