Transforming Web Experiences with MediaPipe and JavaScript: A Comprehensive Deep Dive
This article delves into the seamless fusion of JavaScript and Google's MediaPipe framework, showcasing their combined potential through practical code examples, real-world use cases, and step-by-step instructions for creating innovative web applications, particularly in the realm of Augmented Reality (AR), with enhanced interactive features.
05 Sep 2023
4 min read
In the dynamic landscape of web development, innovation often emerges from the harmonious integration of cutting-edge technologies. One such synergy exists between JavaScript and Google's MediaPipe framework, offering an avenue to revolutionize web experiences through real-time computer vision and machine learning. In this in-depth exploration, we will navigate the realms of JavaScript and MediaPipe, unveiling their combined potential with practical code examples, use cases, and step-by-step instructions.
Unveiling the MediaPipe Toolkit
Before immersing ourselves in practical implementations, let's comprehend the versatile toolkit that MediaPipe brings to the table. MediaPipe, crafted by Google, equips developers with pre-built machine learning models for tasks like facial recognition, pose estimation, and more. By seamlessly integrating these models with JavaScript, we open doors to a multitude of creative applications.
Prerequisites
To embark on this immersive journey, a solid grasp of JavaScript fundamentals and web development is essential. Ensure you have a code editor, Node.js, and a device with a webcam for experimentation.
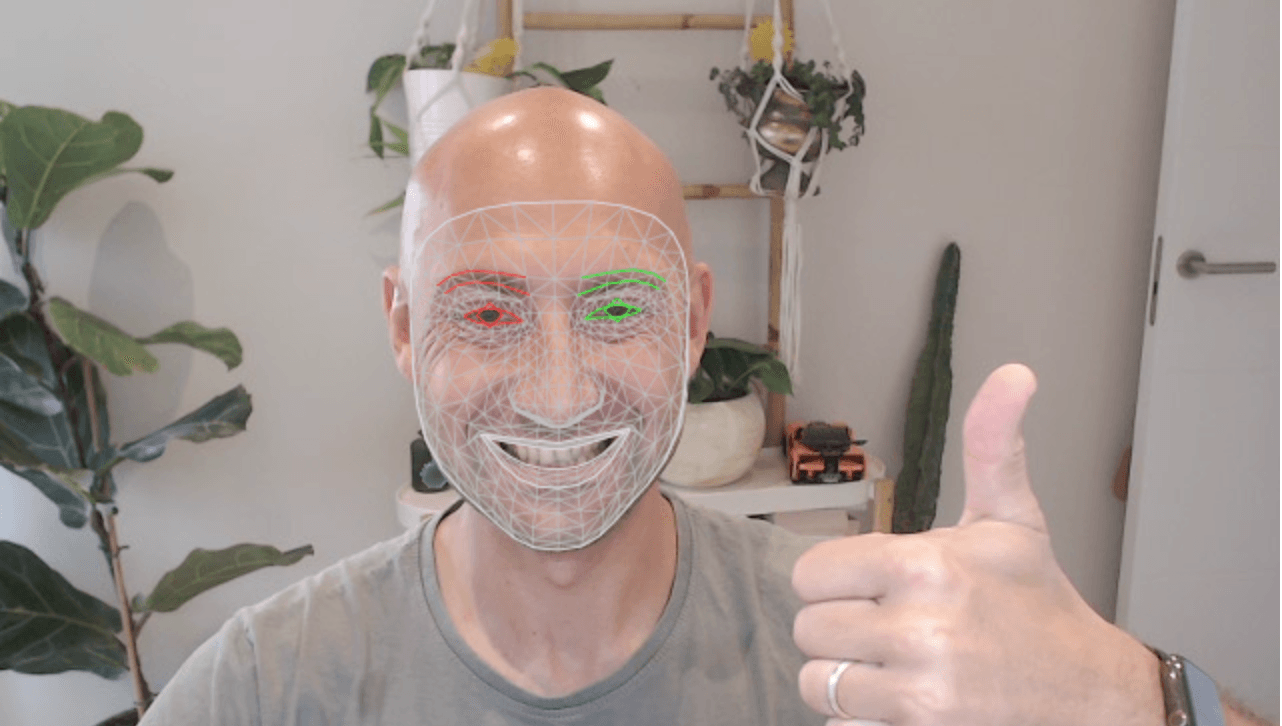
Use Case: Augmented Reality Filters
Imagine a web application that embellishes users' faces with interactive and entertaining augmented reality (AR) filters. This real-world scenario will serve as our canvas for exploration.
Step 1: Project Initialization
- Create a new project directory and set up a Node.js project:
mkdir ar-filters-app
cd ar-filters-app
npm init -y
- Install the required dependencies:
npm install @mediapipe/face_mesh @mediapipe/camera_utils @mediapipe/drawing_utils
- Structure the project as follows:
ar-filters-app/
├── index.html
├── index.html
├── js/
│   ├── main.js
│   └── filters.js
├── styles/
│   └── main.css
├── assets/
│   ├── filters/
│   │   ├── glasses.png
│   │   └── crown.png
│   └── effects/
│       ├── sparkle.gif
│       └── rainbow.gif
└── images/
    └── sample.jpg
Step 2: Initializing MediaPipe
In main.js, initialize MediaPipe's face mesh module and camera:
import { Camera } from "@mediapipe/camera_utils";
import { FaceMesh } from "@mediapipe/face_mesh";
import { drawConnectors, drawLandmarks } from "@mediapipe/drawing_utils";

const video = document.querySelector("video");
const canvas = document.querySelector("canvas");
const context = canvas.getContext("2d");

const faceMesh = new FaceMesh({
  locateFile: (file) => `../node_modules/@mediapipe/face_mesh/${file}`,
});

const camera = new Camera(video, {
  onFrame: async () => {
    await faceMesh.send({ image: video });
    drawFaceMeshResults();
  },
  facingMode: "user",
  width: 640,
  height: 480,
});
camera.start();

function drawFaceMeshResults() {
  // Implement face mesh result rendering here
}
Step 3: Applying AR Filters
In filters.js, apply AR filters to the detected face landmarks:
const filterCanvas = document.createElement("canvas");
const filterContext = filterCanvas.getContext("2d");
const glassesImage = document.getElementById("glasses");
const crownImage = document.getElementById("crown");

faceMesh.onResults((results) => {
  // Extract face landmarks from results
  const landmarks = results.multiFaceLandmarks;

  // Clear the filter canvas
  filterContext.clearRect(0, 0, filterCanvas.width, filterCanvas.height);

  // Apply filters to landmarks
  landmarks.forEach((landmark) => {
    const noseBridge = landmark[5];
    const leftEye = landmark[159];
    const rightEye = landmark[386];

    // Apply glasses filter
    const glassesX = leftEye.x;
    const glassesY = noseBridge.y - 10;
    filterContext.drawImage(glassesImage, glassesX, glassesY, 100, 40);

    // Apply crown filter
    const crownX = rightEye.x - 50;
    const crownY = rightEye.y - 100;
    filterContext.drawImage(crownImage, crownX, crownY, 100, 100);
  });

  // Draw filtered images on the main canvas
  context.drawImage(filterCanvas, 0, 0, canvas.width, canvas.height);
});
Step 4: Styling and User Interface
In main.css, style the video and canvas elements:
body {
  margin: 0;
  display: flex;
  justify-content: center;
  align-items: center;
  height: 100vh;
  background-color: #f0f0f0;
}

video,
canvas {
  border: 2px solid #333;
  max-width: 100%;
}
Step 5: Wrapping It Up
In index.html, bring it all together:
<!DOCTYPE html>
<html lang="en">
<head>
  <meta charset="UTF-8">
  <meta name="viewport" content="width=device-width, initial-scale=1.0">
  <link rel="stylesheet" href="styles/main.css">
  <title>AR Filters App</title>
</head>
<body>
  <video autoplay playsinline></video>
  <canvas></canvas>
  <script type="module" src="js/main.js"></script>
  <script type="module" src="js/filters.js"></script>
</body>
</html>
Conclusion
This comprehensive exploration has unveiled the potent amalgamation of JavaScript and MediaPipe, as exemplified by our augmented reality filters application. By immersing yourself in the provided steps, code examples, and practical use cases, you've embarked on a journey that extends beyond AR filters – it extends to reshaping web experiences. As you continue to harness the power of MediaPipe and JavaScript, remember that innovation knows no bounds. Happy coding!